What is Unbound DNS?
Unbound DNS is a powerful, validating, and caching DNS resolver built for security, privacy, and performance. It can operate as both:
- A recursive resolver (full DNS resolution)
- A forwarding/stub resolver (using upstream DNS providers)
In this guide, we configure Unbound in forwarding mode with DNS over TLS (DoT) for maximum privacy and simplicity.
If you haven’t read our previous article “DNS?? why it’s so special”, we recommend going through it first before continuing with this guide. It will give you the foundational understanding needed to get the most out of this setup.
What is a Stub Resolver?
A stub resolver is a lightweight DNS client on your system.
The diagram given below explains how the stub resolver works:
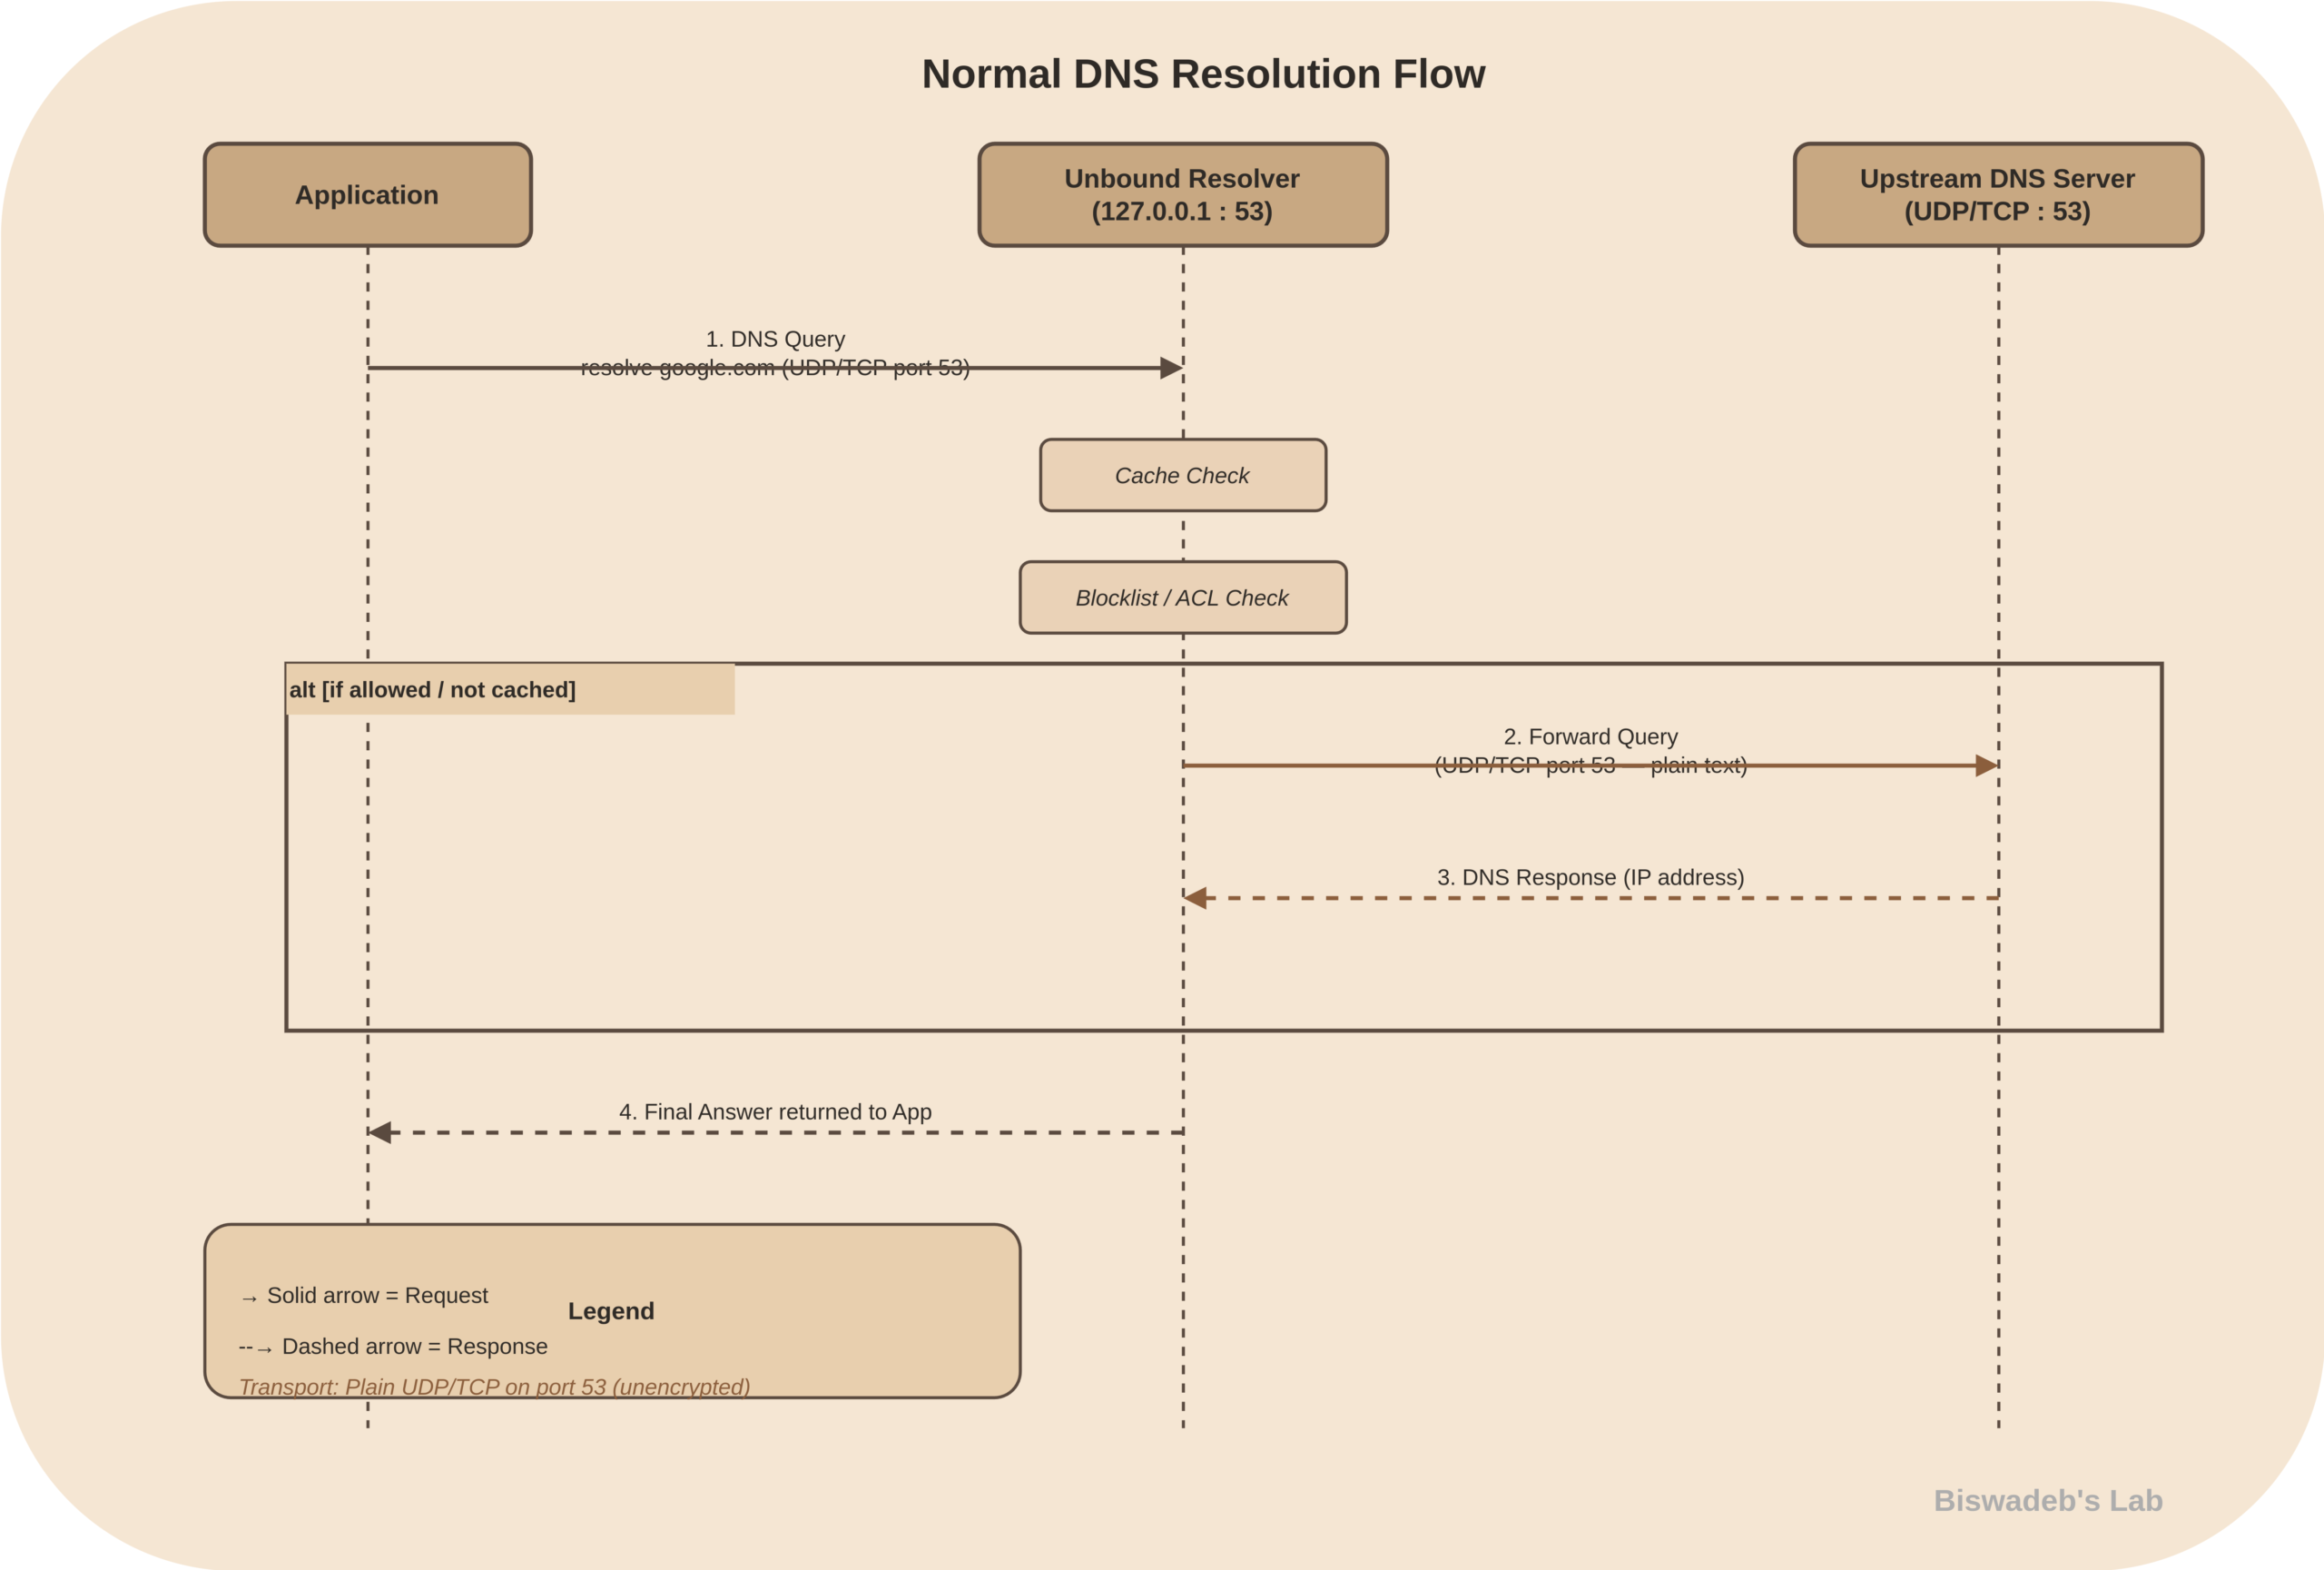
- Instead of performing full DNS resolution, it simply forwards queries to an upstream DNS server.
- As a result, it does not resolve domain names on its own and depends entirely on external resolvers such as Quad9, Cloudflare, or Google.
- Typically, the system is configured to point to a local address like 127.0.0.1, where Unbound listens and forwards requests securely.
Example: Your system is pointing to 127.0.0.1.
What is a Recursive Resolver?
A recursive resolver performs full DNS resolution:
The diagram explains how the recursive resolver works:

- The client or application first sends a recursive query requesting the IP address for google.com. (port 53).
- Upon receiving the request, the recursive resolver (ISP / 8.8.8.8) checks its cache for an existing result.
- However, since this is a cache miss, full DNS resolution begins.
- Next, the resolver queries the Root Name Server (.), asking which servers are responsible for the .com domain.
- Instead of returning an IP address, the root server provides a referral to the .com TLD servers (e.g., ns1.verisign.com).
- Following this, the resolver contacts the TLD name server to continue the lookup process.
- At this stage, it asks which servers are authoritative for google.com.
- In response, the TLD server returns another referral pointing to the authoritative name servers (e.g., ns1.google.com).
- It then directly queries the authoritative name server to retrieve the final answer.
- Specifically, it requests the A record for google.com.
- As a result, the authoritative server returns the resolved IP address (e.g., 142.250.x.x) along with its TTL.
- After receiving the response, the resolver stores the result in its cache for future use..
- Finally, the client uses the resolved IP address to initiate a connection, such as an HTTPS request.
Unbound can operate in this mode, but it requires additional setup (root hints, DNSSEC).
Stub vs Recursive Resolver
| Feature | Stub Resolver | Recursive Resolver |
|---|---|---|
| Role | Forward queries | Resolve fully |
| Complexity | Low | High |
| Control | Minimal | Full |
| Security | Depends on upstream | Strong (DNSSEC support) |
| Performance | Depends on server | Locally optimized |
Which One Should You Use & Why?
- Unlike the recursive resolver, the Stub resolver is easy to configure.
- Use Unbound as your stub resolver
- Use forwarding + DoT for the best balance
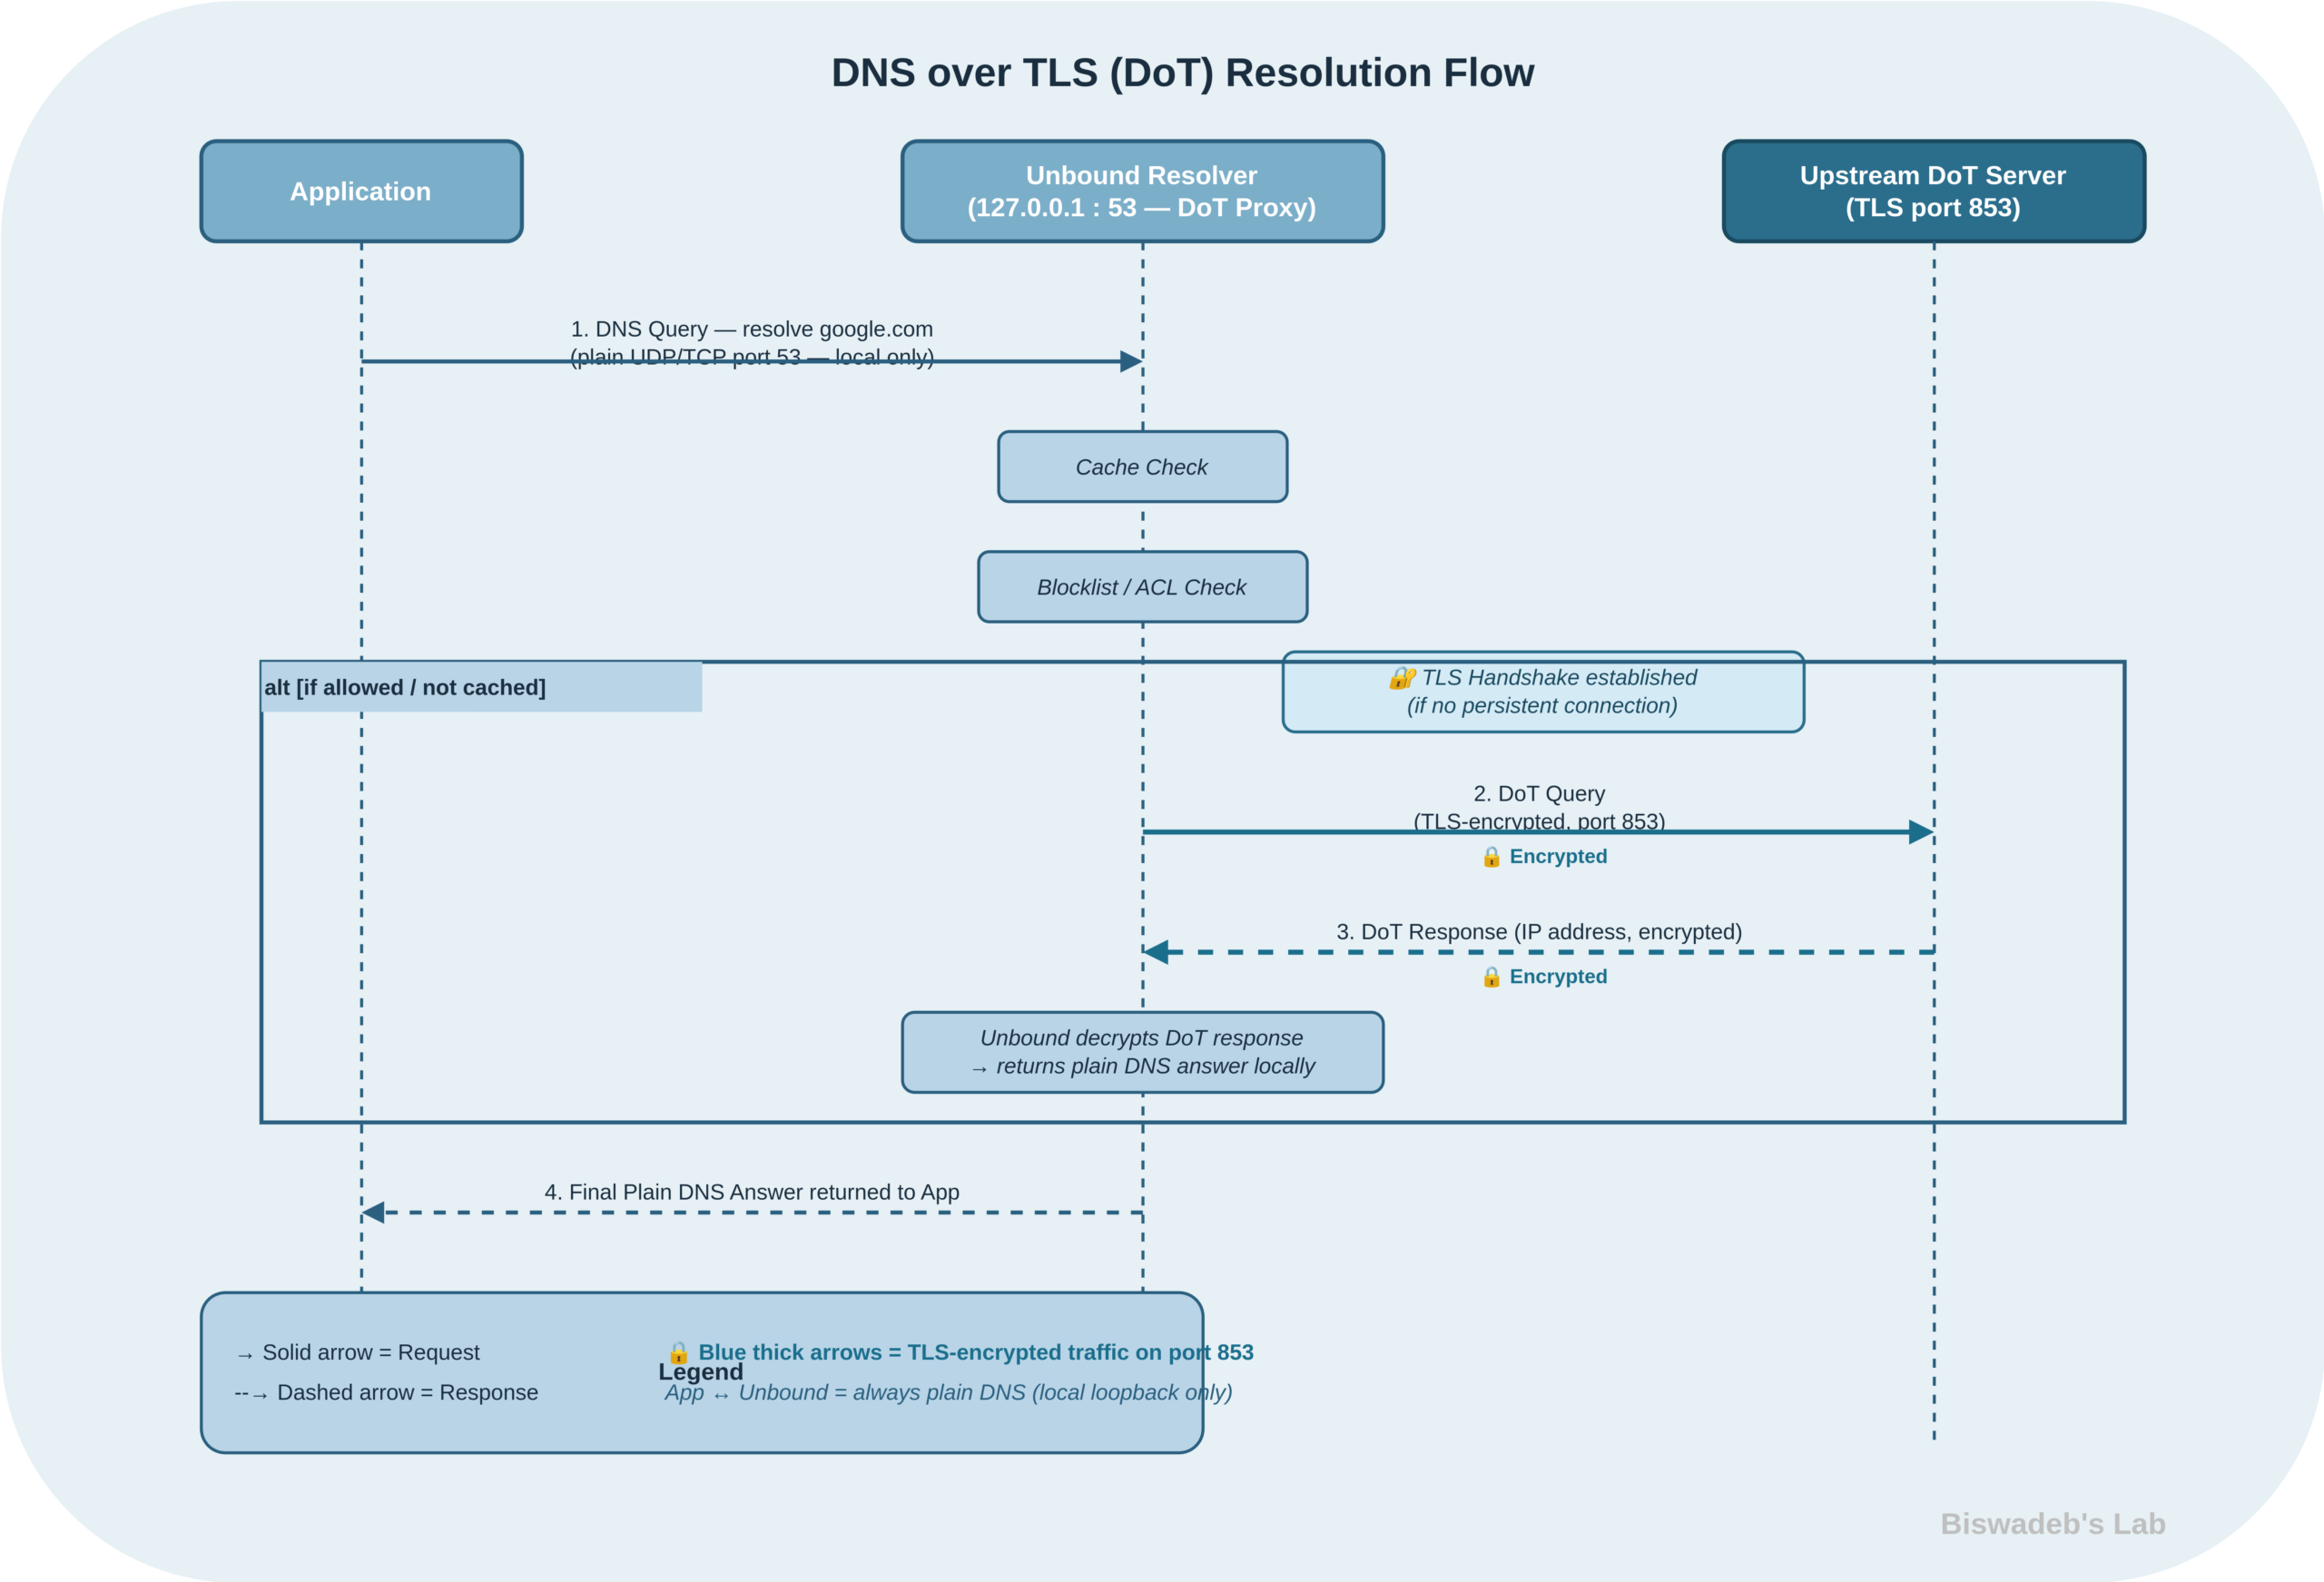
Why Use DNS over TLS (DoT)?
- By default, DNS queries are transmitted in plain text; therefore, anyone between you and the resolver—such as your ISP or an attacker—can monitor them.
- As a result, this lack of encryption exposes your browsing activity to surveillance and potential manipulation.
- However, DNS over TLS (DoT) addresses this issue by encrypting all DNS traffic between your system and the upstream resolver.
- Consequently, it prevents ISP-level monitoring and significantly reduces the risk of man-in-the-middle (MITM) attacks.
- In addition, DoT ensures that your DNS queries remain private and tamper-resistant without requiring complex local validation.
Upstream DNS Providers Used
This setup uses:
- Quad9 (Recommended)
- Cloudflare (Recommended)
- Google Public DNS
These provide redundancy, speed, and optional threat filtering.
In the given guide below, you will get to know how to install Unbound DNS in Linux, but before starting with the Unbound installation, always remember to update your system with the commands given below
sudo apt update
sudo apt upgrade -y
Step 1: Install and Enable Unbound
sudo apt install unboundWe don’t recommend using DNSSEC with DOT as it will increase unnecessary system overhead, CPU cycles and validation conflicts.
Step 2: Config Structure
/etc/unbound/unbound.conf
/etc/unbound/unbound.conf.d/
Files:
server.conf→ Core behaviourforwarder.conf→ DoT upstreamblocklist.conf→ Policy layerlog.conf→ Logging
Step 3: Core Server Configuration (Optimised for DoT Forwarding)
sudo nano /etc/unbound/unbound.conf.d/server.conf
server:
    interface: 127.0.0.1
    port: 53

    access-control: 127.0.0.0/8 allow

    do-ip4: yes
    do-ip6: yescycyclecle
    do-udp: yes
    do-tcp: yes

    verbosity: 1

    # Privacy
    hide-identity: yes
    hide-version: yes
    qname-minimisation: yes

    # TLS trust (REQUIRED for DoT)
    tls-cert-bundle: /etc/ssl/certs/ca-certificates.crt

    # Performance tuning (important since no DNSSEC overhead)
    prefetch: yes
    rrset-cache-size: 100m
    msg-cache-size: 50m

    # Hardening (lightweight, no DNSSEC validation)
    harden-glue: yes
Step 4: DNS over TLS Forwarders
sudo nano /etc/unbound/unbound.conf.d/forwarder.conf
forward-zone:
    name: "."
    forward-tls-upstream: yes

    forward-addr: 9.9.9.9@853#dns.quad9.net
    forward-addr: 1.1.1.1@853#cloudflare-dns.com
    forward-addr: 8.8.8.8@853#dns.google
✔ This is your core security layer
✔ Encryption without local validation overhead
Step 5: Domain Blocking (Policy Layer)
sudo nano /etc/unbound/unbound.conf.d/blocklist.conf
server:
    local-zone: "facebook.com" always_nxdomain
    local-zone: "instagram.com" always_nxdomain
Step 6: Logging (Recommended)
sudo nano /etc/unbound/unbound.conf.d/log.conf
server:
    logfile: "/var/log/unbound.log"
    log-time-ascii: yes
    verbosity: 1
sudo touch /var/log/unbound.log
sudo chown unbound:unbound /var/log/unbound.log
Step 7: Enable & Start Service
sudo systemctl enable unbound
sudo systemctl start unbound
Step 8: System DNS Configuration
Avoid breaking the resolver stack.
For systemd-resolved systems:
sudo nano /etc/systemd/resolved.conf
DNS=127.0.0.1
DNSStubListener=no
sudo systemctl restart systemd-resolved
sudo ln -sf /run/systemd/resolve/resolv.conf /etc/resolv.conf
Step 9: Testing
dig @127.0.0.1 google.com
Compare:
dig @8.8.8.8 google.com
Step 10: Verify DoT is Active
sudo ss -tulpn | grep 853
✔ You should see outbound TLS connections
Step 11: Log Rotation
sudo nano /etc/logrotate.d/unbound
/var/log/unbound.log {
    daily
    rotate 7
    compress
    missingok
    notifempty
    create 640 unbound unbound
}
Outcome
You now have:
- Encrypted DNS (DoT only, no redundancy)
- Local caching resolver
- Domain-level policy enforcement
- Clean architecture (no mixed resolver roles)
- Lower processing overhead
References
- Unbound DNS Official Documentation
https://nlnetlabs.nl/documentation/unbound/ - NLnet Labs – DNSSEC Trust Anchor Guide
https://nlnetlabs.nl/documentation/unbound/howto-anchor/ - Internet Assigned Numbers Authority Root Anchors
https://data.iana.org/root-anchors/root-anchors.xml - Quad9 Documentation
https://www.quad9.net/ - Cloudflare DNS Docs
https://developers.cloudflare.com/1.1.1.1/ - Google Public DNS Documentation
https://developers.google.com/speed/public-dns - DNS over TLS Specification – RFC 7858
https://datatracker.ietf.org/doc/html/rfc7858


Leave a Reply